|
|
 |
|
|
 |
|
|
|
The Anatomy of a Pack, or How I Repaired my own NiMH Battery
© Steve Duncan, 2007
Disclaimer and Safety Notice: NiMH batteries are capable of supplying extremely high currents. In the process of disassembly, repair and reassembly, there are numerous opportunities to accidentally create a short that can result in fire, cause a burn, or damage your pack. Do not attempt to repair your own pack unless you are comfortable with the tools and procedures involved. Even then, I cannot be responsible if you choose to do so. That said, the process is not exactly rocket surgery either.
Introduction
Nickel Metal Hydride (NiMH) battery packs are being used with increasing frequency in Light Electric Vehicles such as electric bicycles and scooters. Unfortunately, when they fail, most people tend to replace the entire pack. OEM NiMH packs are expensive, and sometimes no longer available at all. Then, a custom pack must be ordered.
Unlike Sealed Lead-acid batteries which combine multiple cells, NiMH packs are a series of individual cells. They are typically standard battery sizes, such as C or D size, and some lesser known (but still standard sizes) like Sub-C or F. At 1.2 volts each, a 24 volt pack will contain a string of 20 batteries, and a 36 volt pack will have 30.
Unless a catastrophic failure occurs to the entire pack, such as severe overcharging, reverse charging, or shorting for long periods of time, it may be possible to replace one or more single cells at a very reasonable cost. Individual cells can be purchased, either locally or over the internet that match the rating of those in your pack.
In this article, I will outline my experience in diagnosing, repairing and reassembling my 9Ah, 30 D-cell NiMH pack. It was originally obtained from Powerassist.com. Before the site went down for good, there was a note pointing interested parties to Dynapower Taiwan, Ltd. From this site, it seemed obvious that they were the source for the components in my pack.
Symptoms
The range on my electric recumbent bicycle had dropped from 10 to 3 miles, and my pack voltage was quick to draw down, even after short periods of operation. Charging seemed normal, with the pack generating its usual amount of heat. I finally had to admit to myself that I had a battery problem. Although they are nominally rated at 1.2V, a healthy NiMH cell will measure 1.35V or better without a load, resulting in 40+ volts with no load. My pack was almost immediately dropping and staying below 38.7 volts, the top rung on my LED ladder display.
|
|
|
|
Inspection and Diagnosis
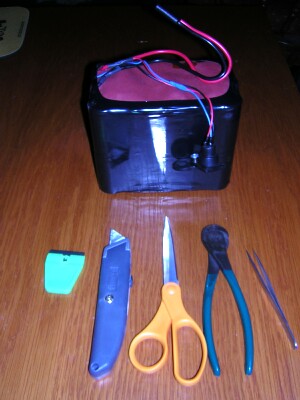
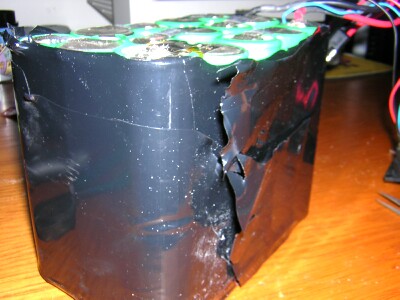
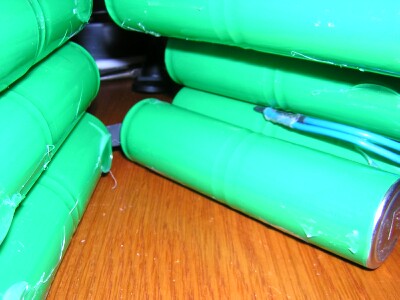
The hardest part was cutting the shrink-wrap off the pack, because it mean no turning back. I had already removed and replaced the shrink-wrap once for a bad weld, and knew it was not commonly available in these large sizes. The place that helped me before was now ignoring my pleas for help, so I was on my own. After the shrink was off, I could see that the ends of the pack were covered with a hard paper that was presumably heat resistant. I removed it carefully to avoid tearing it.
|
|
|
|
|
|
|
|
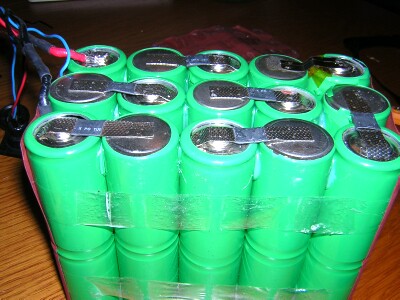
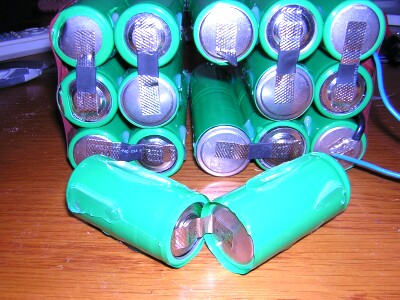
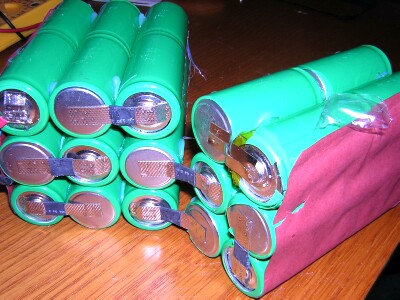
Now my pack was completely exposed, and I could see the construction; Two D-cells were welded end-to end, and covered in shrink-wrap. Fifteen of these pairs were arranged in three rows of five. With the plus and minus terminals of each two-cell string exposed, I simply measured the end-to-end voltage of each pair. Most were consistently between 2.6 and 2.7 volts, but right in the middle, one pair read 1.35 volts. I had a shorted cell.
|
|
|
|
|
Cracking the pack
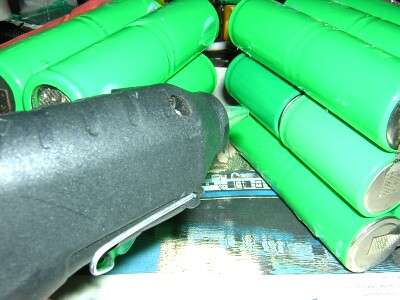
The cell pairs were arranged in an alternating fashion, so the plus and minus terminals could be connected with a material known as battery bar, a highly conductive material that is also flexible. Most commercial packs are welded a process that puts a powerful charge on both the battery and battery bar and makes a point of contact with a pointed tip. A large amount of heat is generated, fusing the two pieces. 4-5 welds seem to be typical per cell. Along with the battery bar, the cell pairs were held together with some type of glue possibly RTV or from a hot glue gun.
|
|
|
|
|
|
|
 |
|
|
|
The Thermistor
Now I could see that the thermistor was floating loose inside the pack. Typically, it should be glued into a crevice between two rows of cells in the center of the pack so it more accurately reflect the cell temperature, not the air. At room temperature, my thermistor read about 12.5K ohms. It has a negative temperature coefficient, so as temperature rises, the resistance decreases. It turned out that my charger seems to cut off when the resistance is below 5K ohms. At that point the pack is piping hot, probably at least 150 degrees.
|
|
|
|
|
|
Sourcing a Replacement Cell
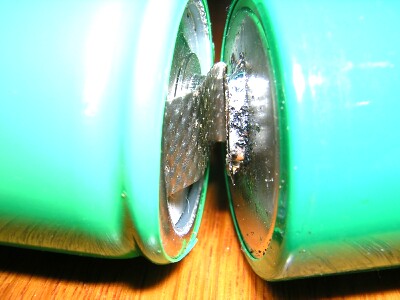
I separated the defective pair and determined that one of the two cells was a dead short - not even a few millivolts. I suspect that during thermal expansion, the battery bar that was across the positive terminal button came in contact with the edge of the battery case. Regardless, it was dead, Jim. So what do I replace it with?
Initially, my fear of soldering directly to the battery made me look for a cell with terminals already attached. These turned out to be fairly uncommon, which makes sense. Why would you want to introduce 60 F1 terminals to your battery pack? My confidence was helped after I read this article, and this one too on soldering your own battery packs.
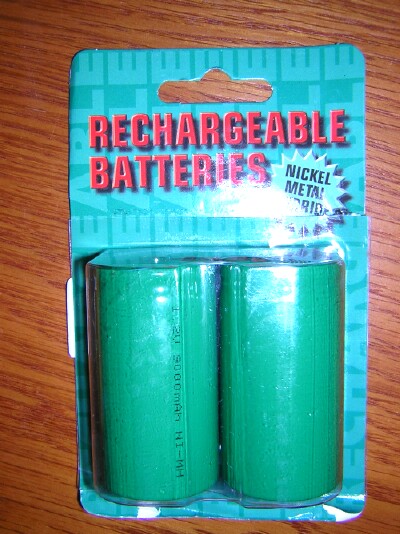
Next, I considered the amp-hour rating and cell weight. My original cells were 9000mAh, 180 gram units. Should I try and match the exact capacity and weight? My decision was made when I placed a call to my local electronics parts store, Norvac Electronics and heard they had a two-pack of Dantona 9000mAh D-cells for $20.50. Easy availability made my decision. These were relative lightweights at 155 grams.
|
|
|
|
Initializing the New Cell
Everyone knows NiMH batteries do not suffer a memory effect, but some folks swear they work better if you initially charge and discharge them a few times. Regardless, I wanted to test these new batteries to make sure one of them was not weak.
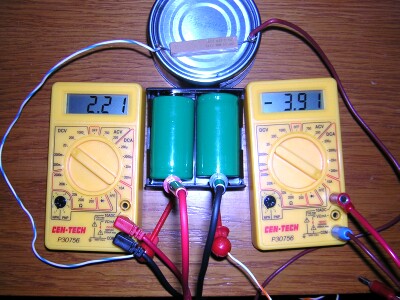
While at Norvac, I purchased a two-cell battery holder. I took them home and pawed through my collection of AC adaptors until I found a 3V 800maH supply for a Sony walkman I did not own any more. Normally, you should always use a charger designed for NiMH, but in my case, it would be attended for the entire time. Plus, charging at .1C (1/10 capacity) is considered safe for long periods with NiMH cells. It faithfully put out 850mA and after 6-7 hours, I was ready to discharge test. Back to the junk bin, where I found a .33ohm, 10watt resistor. In series with my cheapo DVM, it measured 4 amps steady on the 10A scale. After a couple of cycles, I decided that these cells were going to pass muster. On the last cycle I ran them down to the point that the unloaded voltage was about the same as those in the rest of the pack.
|
|
|
|
Here are some general hints
- Rough up the surface with fine sandpaper. A mototool at low speeds works great.
- Use a solder with a high rosin content. You will be able to tell because a small puff of smoke will appear when you touch it to your iron.
- Use a 60 watt iron. A chisel tip is preferable to a pointed one. Be sure you let it heat all the way up, and re-heat between soldering jobs.
- Clean the tip with a wet sponge, and re-coat (tin) the iron with solder.
- Apply solder to both surfaces individually first. Then solder together.
- Make sure the solder flows completely between both objects. Hold it dead still for a good 30 seconds to let it cool without creating a fault in it. You should be able to pull firmly on the joint and not have it come apart.
I had worried about frying the battery with heat, but these D-cells are so heavy they barely get warm at all.
|
|
|
|
Reassembling the Pack
My two batteries were soldered together and aligned well. I probably should have put another layer of 1.5 shrink tubing around them, but I didnt have any so I relied on the existing shrink on the cases. I heated my hot glue gun up, and placed a drop of glue where I wanted to put the thermistor. I glued it in place, being careful not to coat the actual thermistor with glue just the wires. Then, as quickly as possible I placed dabs of glue on all four sides of the missing cells, and also where the other batteries were separated. I pressed the pack back together and waited for the glue to harden before I soldered the new pair back to the rest of the pack.
This is where you really need to be careful, because you are using tools on a live pack, and once you make that last connection, there are plenty of ways to short it out.
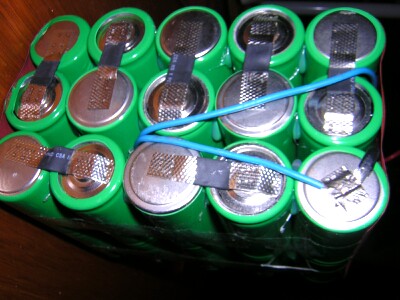
Since I did not have any battery bar, I used three strands of solder wick in parallel instead. Solder wick is a copper braid used to draw unwanted solder from joints. It is also very flexible. Where battery bar passes over the edge of an existing cell on the positive side, its a good idea to place an insulator under it in case the battery bar is smashed down by some unforeseen force (like a pothole).
|
|
|
|
|
|
Bench Charging
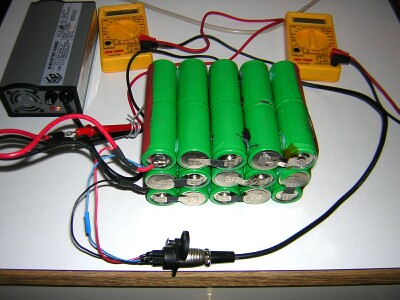
I hooked up my dedicated 2.5A NiMH charger and powered it on. If there was a problem with the thermistor, or under or over-voltage, it would not have fired up, but it did. I allowed the entire pack to charge until automatic shut-off occurred. Just prior to shut-off, I measured the voltages across each cell pair and the entire pack. This mapping could serve to help me evaluate the health of the original remaining batteries in the pack. With 43.6 volts across the output connector, I measured voltages of between 2.86 and 2.94 volts per pair. The pairs with higher voltages were also noticeably warmer than the lowest ones. Does a battery that shows higher voltage during charging indicate a weakness or strength? After shut-off, the pack voltage was 43.1 volts. After 90 minutes it was 41.4 volts. The thermistor read 4.35K ohms at cut-off, and as mentioned earlier rises to 12.5K at room temperature.
|
|
|
|
Bench testing the repaired pack
|
|
|
|
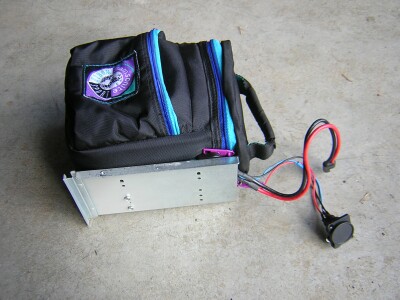
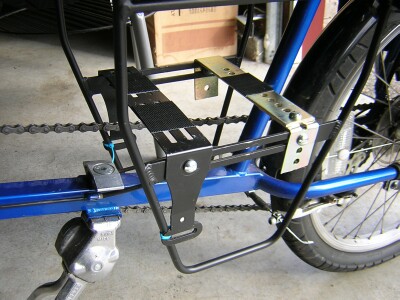
Final Assembly
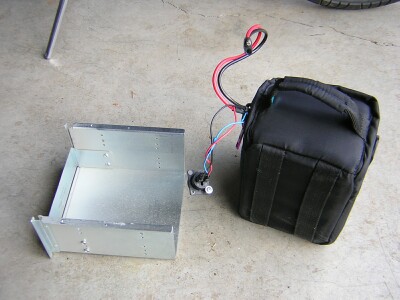
At this point I would have re-shrank the pack, but again I didnt have any, so I put the pack in a highly padded camera bag instead. In the process, I wanted to move my pack from the back rack to under the seat. The camera bag fit snugly into an old-style metal hard-drive enclosure, and fit sweetly under my seat, attached with commercial- quality Velcro. For the complete story of my electric recumbent, read my article The Hawkins Electric Lawn Chair 36V Recumbent Bike.
|
|
|
|
|
|
Summary
With a few hours work, I was able to put my almost three year old NiMH pack back in service. Is it as good as new? Probably not, but at least it is back to normal voltage levels, and will charge correctly. Maybe Ill get another year or two out of it. With NiMH D-cells starting to top 10,000mAh and break the $10 barrier, I think this battery chemisty is just starting to enter the mainstream for electric vehicles. Someday Id love to make my own pack out of giant F-cells!
|
|
|
|
|
© Steve Duncan, 2007
|
|