|
|
 |
|
|
The 30V Electric Scooter Mod
Disclaimer: modifying your electric scooter can result in damage to your components and will certainly void your warranty. But then, you knew that, didnt you?
|
|
|
|
Introduction
It seems no matter how fast your electric scooter is when you get it, you will eventually want to speed it up. A 15MPH scooter is fun, but when you get up to 18-20MPH its a significantly more invigorating ride.
Speed relates directly to the RPM of your motor, and higher voltages result in a higher RPM in most cases. If you dont change the motor gearing, that means an increase in speed. By increasing voltage 25% on the three 6V mods Ive done, one scooter went from 12 to 15MPH, and the other two from 15 to 19MPH.
By far, one of the easiest performance upgrades to do is a 24 to 30V modification. Many scooters are 24 volts in their stock condition, and most will see an increase of 20% in MPH. Many controllers will handle the extra six volts, and six volt batteries are available inexpensively in a wide variety of capacities and sizes. You can make the mod full time, part time, or turbo mode with a switch and relay.
What are the downsides of the 30V mod?
- You will have to attach an extra battery somewhere on your scooter
- 30V SLA chargers are not common so you will need to be able to break the circuit and charge both batteries separately (and buy a 6V charger)
- Every time you add wire length and connectors to your scooter you cause a voltage drop and loose some power
- Built-in protection circuits may no longer save you from damage, say during a stall on a hill
- You may break something doing the mod, damage your components, or void your warranty. But then, riding the darn things is risky too.
|
|
|
|
|
|
Can Your Scooter Take It?
Your scooters ability to tolerate the additional voltage is usually dependent on the controller. Ideally, open the controller and look on the components for voltage limits. You would also need to look up the power transistors for their limits. Many scooters have motors with integrated controllers potted in resin. With these, you will need to rely on anecdotal reports of other people. Or you could just try it. Stock motors will usually tolerate the additional voltage. If the motor does not run overly hot after the mod, you are probably fine.
It is important to remember that a 12V SLA battery is not 12V. Its more like 12.8. So if you have a 24V circuit, its more likely to measure 25.6. Adding a 6V (6.4V) battery can bring the total voltage to 32 volts! Some folks will only switch in the extra battery after the primary 24V system has started to wane to avoid stressing the components.
You also need to remember that you are adding both weight and torque to your scooter. If you have a rear wheel that is supported by bicycle-type spokes, you can almost expect to break a spoke sooner or later. Early Flyer scooters have spoked wheels with a radial (non-crossed) design. I broke a spoke on my Tsunami, had it repaired, and broke another one. I had to replace those spoked wheels with Ideation mag wheels from ElectricScooterParts.com. I also broke a spoke on the 2001 Flyer I modified, and ended up replacing the radial spoked rear wheel with the (repaired again) cross-spoke wheel from the Tsunami.
You should think carefully before changing your gearing at the same time. If you gear higher for additional speed, you are adding the strain from the gear change on top of the stress of over-volting your motor and controller. If you gear lower, you will give up the extra speed, but may improve hill-climbing power.
Selecting a Battery
If you want to maintain your range and plan to run 30V full-time, you should select a battery with a very similar amp-hour rating to the other two. If you have space constraints, you can still add a slightly smaller battery for part-time or turbo mode operation. Where you find space for the battery may dictate the form factor. Since there is rarely enough space in the original battery compartment for another SLA, you may need to locate it:
- On top of the back fender
- Attached to the steering support tubes
- In front of the deck, behind the front wheel
- Other imaginative locations, like a trailer
Possible Wiring Configurations
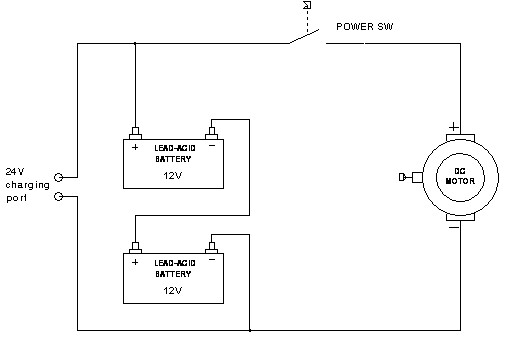
Part of the beauty of the 30V mod is the simplicity in wiring it up. Adding another 6V battery is done by putting it in series with the existing circuit. Consider the following (simplified) diagram:
|
|
|
 |
|
|
|
Theoretically, you could break the circuit anywhere between the batteries and the motor to insert a 6 volt battery. When deciding where to break the circuit, try and observe the following:
- Start at an existing connection like a battery terminal rather than cutting a wire
- Do not bypass the main power switch
- Insert your battery so it can be removed from the original 24V charging circuit
- When wiring batteries in series, always connect plus to minus and minus to plus
- Try to keep wire lengths as short as possible
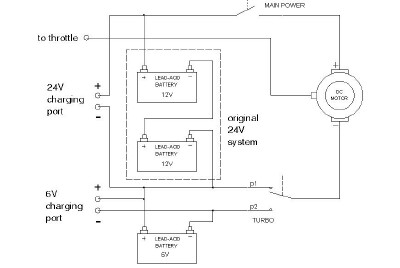
Heres a diagram of the same circuit with an additional 6 volt battery and a turbo switch:
|
|
|
|
|
 |
|
|
|
When the turbo switch is in the up position, the motor circuit is in its original 24V configuration. When in the down position, the third battery is placed in series for 30V operation.
The turbo switch could just as easily be a relay, with the coil voltage supplied by one (12V) or both (24V) batteries through a small switch on the handlebars. The current rating for either the switch or relay should be 20A or more. The switch shown is a SPDT (single pole, double throw). If you purchase a DPDT switch, you can parallel both sets of contacts to increase the current carrying capacity. Switches and relays come with various terminals, including solder-on, screw-on and push-on, so choose appropriately.
One option to switches or relays that both simplifies wiring and reduces loss is to use high-current connectors and simply plug and unplug the additional battery for stock operation or charging. To restore stock operation, you simply put a loop-back connector on the two wires going to and from the original circuit.
General Wiring Tips
When making all these connections to the original batteries, the new battery and the switch or relay, you are adding a lot of interruptions in the circuit which can cause losses - which we want to minimize. Many batteries and connectors use the Faston type push-on connectors, which come in .250 and .187 inch widths. A step up from these are 20A Molex connectors, like the 274-154 and 274-151 available from Radio Shack. The best solution is Anderson Power-pole type 40A connectors.
If you do end up using Faston, you should know that these crimp-type connectors are notoriously bad for making poor connections. You can help insure a good contact and long-lasting connection if you:
- Choose the right color connector for the wire gauge. For 10-12 gauge, that is yellow
- Practice crimping wires into these connectors until you cannot easily pull the wire from the connector body
- Consider using solder-type connectors, bolt-on connectors, or reinforce your crimp job with some flowed-in solder
- Carefully squeeze the female Faston connector from each side to make a more secure connection. It may be so tight that you may need to push it on by holding it with needle nose pliers.
When you are making multiple connections, you may find it handy to use a piggy-back push on connector that lets you Y two connections into one, essentially making three connections. Sometimes you have to buy an assortment to get some of these multi-tap connectors which come in a variety of styles.
Ideas for Mounting the Battery
You dont want the battery to fly off when you hit a bump and rip the wires out with it. I have used the following techniques to securely attach batteries:
- Wrap the battery in a cut-up car inner-tube and secure with the best quality and thickness tie-wraps that will fit/work
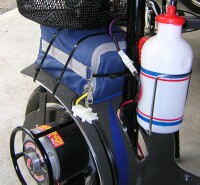
- Put the battery in a snug-fitting camera-type bag. Use a cut-up mouse pad under the bag and wrapped around the top of the battery (inside the bag) to prevent shock. Secure to fender with tie-wraps.
- Make some brackets. Wrap battery with cut-up tire tube or mouse pad. Insert between brackets. Secure with deck screws and / or tie-wraps.
You can see some pictures of my work in the photos that accompany my case studies.
Charging Options
If you decide to buy a 6V charger, you might have to compromise. The least expensive and commonly available 6V charger is the Battery Tender Jr. from DelTran. It is widely available for $40 at most stores, including Batteries Plus, but only puts out .75A. At the $60 price point, you can get the Battery Tender Plus, a 1.25A charger. With these chargers, youd better allow 6-12 hours between rides! I found that chargers more powerful than these get much more expensive fast.
Another option is to use a bench supply to provide the bulk of the charge to either the 6V battery alone, or all batteries, then switch to intelligent float chargers to finish the cycle. I have also used an older automotive-style charger to bulk charge a 20Ah 6V battery. It puts out 6A, which is right at the top of recommended maximum charging current for that battery. Remember, if your batteries are not the same capacity, you should charge them separately, not in series.
Case Studies
Case Study 1 Sporty/Eclipse Belt-driven scooter
|
|
|
|
This was my first 6V mod, and it made the Eclipse much more enjoyable. I also modified the controller to eliminate the soft-start feature. I returned it to stock before selling it in my garage sale.
|
|
|
|
|
Motor/Controller:
|
200W Brush-type, on/off type controller
|
|
Stock Batteries:
|
2 x 12V, 12Ah
|
|
Battery Used:
|
6V, 10Ah Panasonic, .250 Faston
|
|
Battery Location:
|
Front of deck, behind front wheel, tie-wrap mounting, tire tube insulation
|
|
Charger:
|
Battery Tender Jr. (3/4A)
|
|
Wiring Method:
|
Faston connectors
|
|
Boost Type:
|
Full-time boost, loop-back using male-male Faston plug
|
|
Speed Before Mod:
|
11 MPH
|
|
Speed After Mod:
|
15 MPH
|
|
|
|
|
Case Study 2 2001 Currie Phat Flyer
|
|
|
|
|
Motor/Controller:
|
400W HiKol Brushless, integrated variable speed controller
|
|
Stock Batteries:
|
2 x 12V, 10Ah
|
|
Battery Used:
|
6V, 9Ah Powersonic (for ride-on toy: 1 x .250, 1 x .187 Faston)
|
|
Battery Location:
|
Top of rear-deck, brackets made from hose hangers, mouse-pad shock-mounting
|
|
Charger:
|
Battery Tender Jr. (3/4A)
|
|
Wiring Method:
|
Faston connectors
|
|
Boost Type:
|
Part-time boost, switch selectable (mounted on deck brace)
|
|
Speed Before Mod:
|
15 MPH
|
|
Speed After Mod:
|
18 MPH
|
|
|
|
|
I did this for a friend after reading several posts from people who are running their Currie Hi-Kol BLDC motor/controllers at 30V without frying them. The motor gets hot pretty fast on this one after the mod. I like the way the switch mounted to the deck support. I bent the aluminum hose-hangers in a U shape, and they fit perfectly around the battery wrapped in a mouse pad. They are held on by the screws for the deck support and tie wraps. It was noticeably peppier after the mod.
|
|
|
|
Case Study 3 2004 Currie GT Tsunami
|
|
|
|
|
Motor/Controller:
|
600W Brush-type, 40A variable speed controller
|
|
Stock Batteries:
|
2 x 12V, 18Ah, Fullriver Brand
|
|
Battery Used:
|
6V, 20Ah Powersonic PS-6200, bolt-on connectors
|
|
Battery Location:
|
Top of rear-deck in camera bag, mouse-pad shock-mounting
|
|
Charger:
|
Battery Tender Plus (1.25A)
|
|
Wiring Method:
|
Molex connectors
|
|
Boost Type:
|
Full-time boost, loop back using Molex connector
|
|
Speed Before Mod:
|
15 MPH
|
|
Speed After Mod:
|
19 MPH
|
|
|
|
|
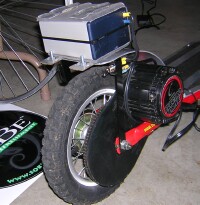
Running on 24V, this 2004 Currie GT Tsunami was rather anemic. After the mod, its another scooter entirely. I think the 600W brushed motor is underrated by many. It is smooth, powerful, and the throttle is easy to modulate very precisely. Torque comes on at higher RPMs than with the brushless motor. You will be climbing a hill, and when you reach a certain speed, it will actually begin to accelerate up that hill. The motor gets hot to the touch after extended rides, but not smoking-hot, and the 40A external controller gets barely hot at all. I rode 8 miles in 90 degree temps with no problems.
I am very happy with this battery. I paid $33 + shipping, and since I used a battery that was very close in capacity to the originals, I get full range with the setup which is conservatively 10 miles or more. I am also happy with the way the battery fit between the basket and deck. The Tsunami just seems to get smoother and more powerful the more I ride it. I think my batteries are just reaching their full potential.
S. Duncan © 8/9/2004
|
|